
Backups are important. In fact, I frequently obsess over it. When I bought and set up a new Raspberry Pi at home, one of the first things I wanted to do was find a way to back it up. More specifically, I wanted the backup to go to an external drive. This way, if the Raspberry Pi failed, its data and settings would still be parked in a safe location.
Well, just so happens, I own an extremely capable Synology Network Attached Storage (NAS). Through its Drive Station app, my home and office computers are synced and backed up in real-time. So, I was quite confident that it could also backup the Raspberry Pi.
It wasn’t as straightforward as desktops and laptops, of course. For one, my Raspberry Pi does not run a graphical operating system like Windows or Mac OS. It’s a stripped-down operating system that runs strictly in a DOS environment, and I wasn’t, strictly speaking, a particular whiz at the command-prompt. I spent an awful lot of time trying to figure out the easiest way to backup my entire Raspberry Pi to a Synology. After many trials, I finally settled on this approach:
PREPARING THE SYNOLOGY NAS
CAUTION: I am not an expert, and everything I’ve described here was a result of internet research, and trial and error carried out on my devices and in my environment. I will not be held responsible if something goes wrong as a result of following the instructions on this page. Do not proceed if you cannot accept the risk of breaking something in your systems. If, however, you still want to soldier on, then…
Step 1: Login to the Synology’s DiskStation Manager (DSM). Go to Control Panel > File Services. Under the SMB/AFP/NFS tab, click on [Enable NFS]. In the ‘NFSv4 domain’ field, give it any name you want.

Step 2: Next, go to Control Panel > Shared Folders. From the list of existing folders, select the folder into which you want to dump your Raspberry Pi backups. In my case, I created a folder named [public], and its full path was [/volume1/public].
Alternatively you might want to create a new one, I don’t care. This will be the eventual destination of your Raspberry Pi backups.
Step 3: With the folder still selected, click the [Edit] button near the top of the panel.
Step 4: Another panel will pop out, where you can do all kinds of interesting stuff to the folder. Be very careful in this area. Nonetheless, what we really want to activate is a feature called Network File System (NFS). Hence, click on the tab called [NFS Permissions], then the button [Create].

Step 5: A new panel will pop up, where you’ll be able to set down some rules for connecting. Make sure you put the IP address of your Raspberry Pi into the [Hostname or IP] field. Then, just follow the rest of the settings in the picture below. Click the [OK] button once you are done. This concludes your preparation work on the Synology.

PREPARING THE RASPBERRY PI
Step 6: Now, SSH into the Raspberry Pi. First thing I usually do before installing any application is to update the software package repositories and system with a quick and breezy:
sudo apt-get update && sudo apt-get upgrade
Step 7: Then, download and install a utility that will enable the Raspberry Pi to read from a NFS shared folder.
sudo apt-get install nfs-common
Step 8: Slow and steady now! We’d have to set a local mount point. You can set mount points anywhere, but for simplicity’s sake, let’s do one at the topmost level of the Raspberry Pi’s directory structure.
sudo mkdir /backup
Step 9: Next, we need to add a line into the fstab file so that the Raspberry Pi automatically mounts the external NFS share and binds it to the local mount point when it boots up. To throw open the file, type this:
sudo nano /etc/fstab
Then, add this line to the fstab file, but replace [NAS_IP_ADDRESS], [PATH/TO/NAS] and [PATH/TO/MOUNT/POINT] with your own values.
NAS_IP_ADDRESS:/PATH/TO/NAS /PATH/TO/MOUNT/POINT nfs auto 0 0
Or, in my case, this would be:
192.168.8.33:/volume1/public /backup nfs auto 0 0
Once done, save and exit.
Step 10: Test the mount by keying in:
sudo mount -a
If everything is good, there should be no error messages. You can try accessing your NFS share, now available through your mount point, by keying in:
cd /backup
Oops. This is where you’ll hit your first road bump. It’s a small bump, though, so just chill. The system will declare, in no uncertain terms, that you do not have permission to access the folder. That’s fine.
Step 11: We’ve got to set the correct permissions for the NFS share, of course. Before you can do that, you’ll need to give yourself god-level powers by typing:
sudo -i
What this does is instantly give you root access to the system- a typically dangerous procedure under ordinary circumstances. However, we are not going to stay long. And we are definitely going to type very, very carefully. So go ahead and type the following command to change the permission level of the NFS share:
chmod 777 /backup
Then, assign your favourite Raspberry Pi user- in my case the user ‘pi’- to the NFS share like this:
chown pi:pi /backup
Step 12: Switch back from the root user to your favourite user. In my case, this would be ‘pi’.
su - pi
Don’t forget to smirk a little. After all, you’ve just escaped root access in one piece. Try accessing the mount point again by:
cd /backup
You should be able to get into the folder now. To test out your permissions- especially your ‘write’ permission- create a test directory and then remove it.
sudo mkdir test

sudo rm -r test
If no errors appear, we are good to go. Give yourself a pat on the back and proceed to the next milestone.
INSTALLING RASPIBACKUP
Step 13: With your NFS share set up, the next part is pretty easygoing. Download and install the backup software called ‘RaspiBackup’. I am not going to go into detail on how to install the application on the Raspberry Pi, because it is amply covered in its home page. Needless to say, once installed, just follow the on-screen, delightfully menu-driven instructions to configure the application.
CONFIGURING RASPIBACKUP
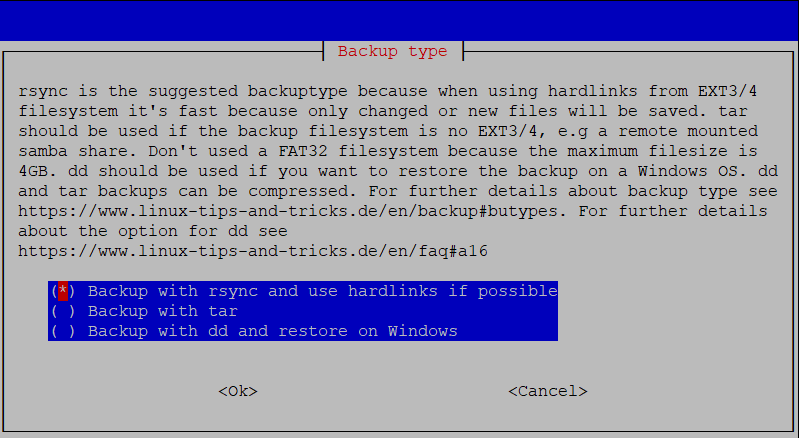
One of the configuration options is to establish a ‘Backup type’. For this, I recommend choosing [Backup with rsync and use hardlink if possible] because it’s the most efficient, and takes full advantage of the NFS share we created earlier. To access the application’s configuration options, type:
sudo raspiBackupInstallUI
Another configuration option asks if you want to turn off services when the backup is being performed. I simply went along with selecting all the recommended choices.

After the backup is finished, the RaspiBackup application is supposed to turn these service back on. However, I found that this process is not very perfect, as my docker containers did not load up after backup. The only way I could reactivate everything on my Raspberry Pi was to reboot it. Fortunately, RaspiBackup allowed me to manually customise its configuration file so that the Raspberry Pi is forced to reboot after the backup is complete. The RaspiBackup configuration file can be opened and edited by:
sudo nano /usr/local/etc/raspiBackup.conf
Once the configuration file is open, look for the variable [DEFAULT_STARTSERVICES]. Comment it out by adding # in front of it. Then, immediately below it, add this line:
DEFAULT_STARTSERVICES="systemctl reboot"
Save and close the file. Now, test your backup with:
sudo raspiBackup.sh -m detailed
The backup should take some time if you have a large, relatively mature Raspberry Pi. When it’s done though, the Raspberry Pi should reboot on its own, and bring everything back up online.


This is a great document, but it should mention the need to set “Network at boot” in the raspi-config system options. This ensures that the /etc/fstab mount of the NFS can succeed when the Pi boots.
Thanks man, this was simple and great!